Use this GitHub action to either warn or add a default label based on prefixes.
Usage
steps:
- uses: trstringer/require-label-prefix@v1with:
secret: ${{ github.TOKEN }}# prefix is set to whatever prefix you are trying to enforce. For# instance, if you want to make sure size labels (e.g. "size/S", "size/L")# are enforced, the prefix would be "size".prefix: size# The prefix is divided by the suffix by some separator. This defaults# to "https://github.com/" and is typically this, but it could be anything (e.g. ":").# labelSeparator: "https://github.com/"# addLabel, when set to "true", will label the issue with defaultLabel if# the issue doesn't have a label with the prefix. If this is set to "false"# then a label won't be added, there will just be a comment requesting that# somebody adds a label with the labelPrefix.# Options: "true", "false" (default).# addLabel: false# If addLabel is set, defaultLabel is the label that will be added if there# is no label with this prefix already on the issue. E.g. "size/needed".# defaultLabel: "size/needed"# If you want to only comment on or label issues that are part of a milestone# then you would set this to "true". Otherwise, all issues are evaluated.# Options: "true", "false" (default).# onlyMilestone: false
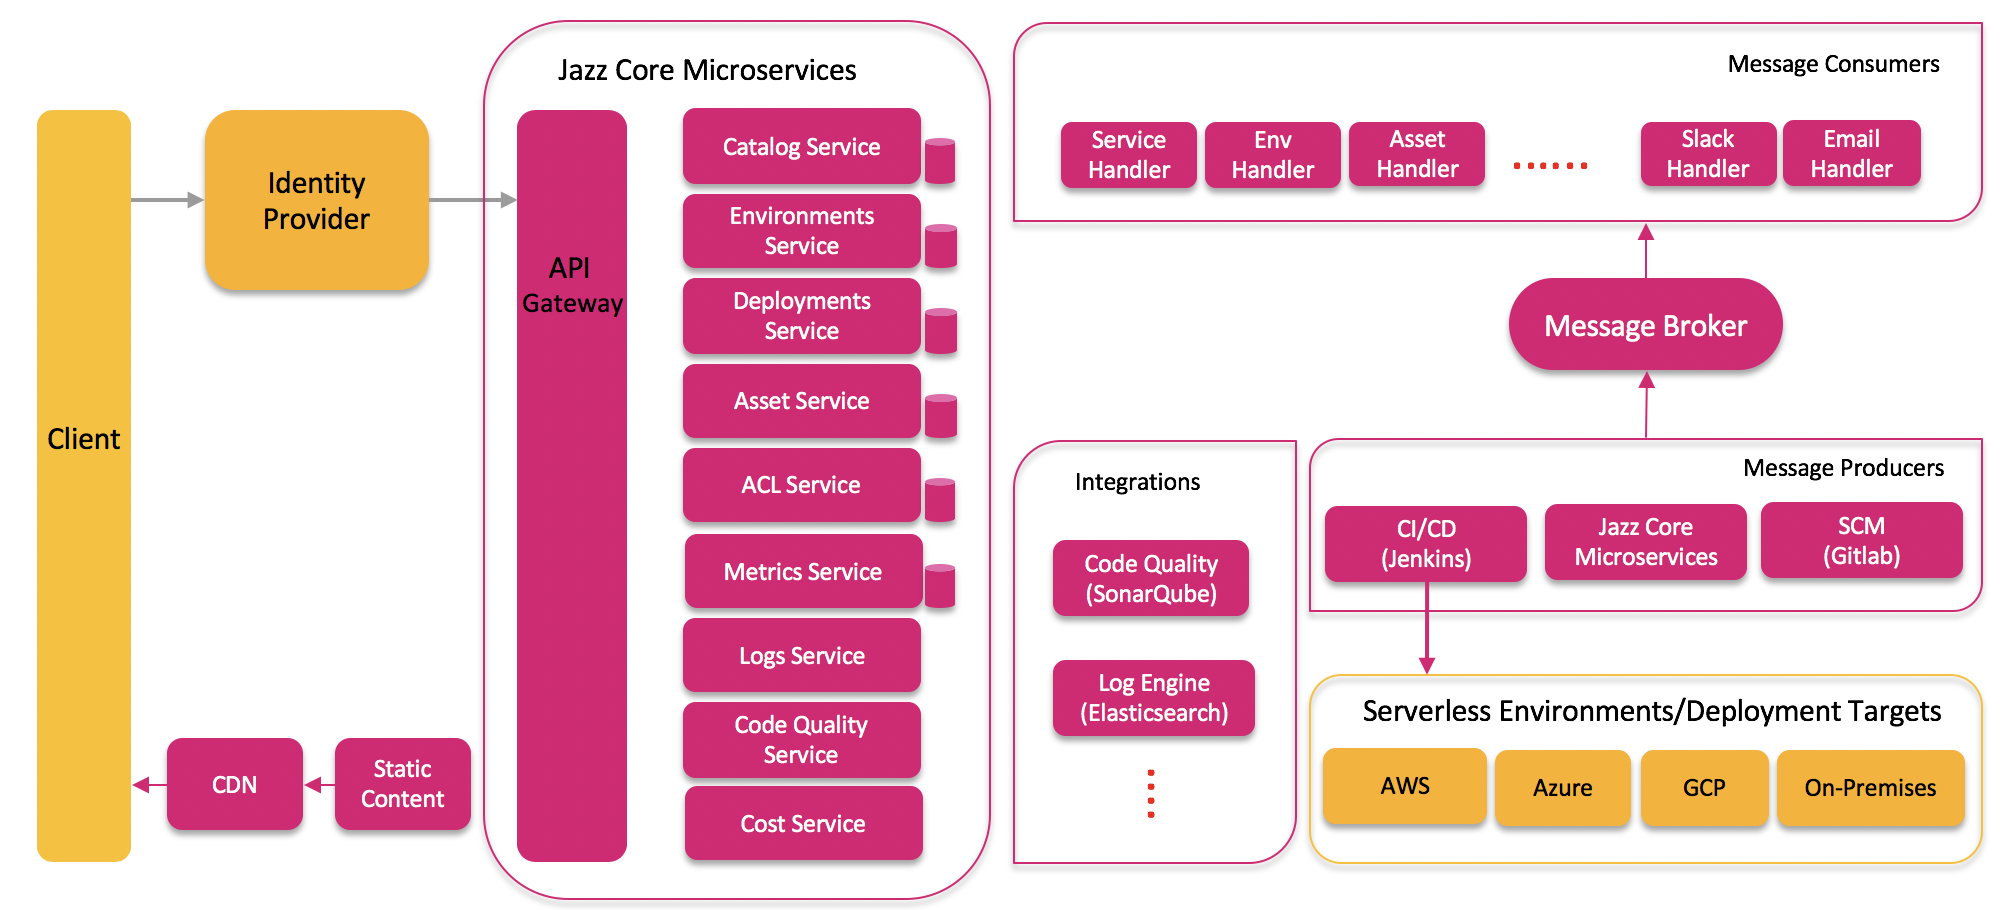
Jazz, a serverless development platform, accelerates adoption of serverless technology within your enterprise. Jazz comes with a beautiful UI that lets developers quickly create serverless applications with a click of a button. Its modular design makes it easy to add new integrations that your enterprise needs.
Overview
Services – As of today, Jazz can help build functions, APIs and static websites. Fully customizable template-based design makes it easy for admins to define new ones and expose them as services to the developers. Jazz also supports Serverless Framework and developers can leverage its rich ecosystem to build serverless apps. Support for AWS SAM will be coming soon!
Deployment Targets – Currently, Jazz can deploy to AWS & Azure. Developers can select their target cloud provider during service creation and Jazz will orchestrate the provisioning in the respective public cloud. GCP support will be available in the near future.
CI/CD – Jazz comes with CI/CD by default. It creates a code repository for each service, assigns appropriate permissions and adds a web hook to trigger build/deployment workflows whenever it sees a commit. We leverage Jenkins open source for the build process and Serverless Framework for deploying these services.
One-Click Development Environments – Jazz automatically creates a new dedicated development environment for each git branch in the service repository. This allows parallel development in a multi-developer team without a hitch! Jazz takes care of deleting these environments once the branch gets deleted.
Security Controls – Centralized platform allows administrators to define & apply security controls from a single place through Jazz. Admins can choose to enforce the controls on every service that gets created using Jazz allowing them to make them secure by default. Many best practices like applying the principle of least privilege, code (& dependency) scans during CI/CD, preventing default public access are available by default in Jazz.
Secret Management through T-Vault – Jazz comes with T-Vault integration by default encouraging developers to leverage secrets management service for storing their secrets. Each service gets its own set of safes (one per environment) and functions (AWS Lambda only) that are part of the service get automatically configured with required permissions to retrieve the secrets. Developers can simply login into T-Vault interface and store their secrets in the allocated safes. No more hard-coded secrets in the code!
Extensions – Jazz is designed to integrate and work well with other systems that your enterprise needs. You can check out our optional extensions like Azure, Slack, Splunk, Apigee etc. Centralized configuration helps Jazz admins to easily enable/disable these features as per their needs.
Multiple Accounts & Regions – Jazz’s multi account/region extension allows you to add support for multiple accounts & regions to an existing Jazz stack. Developers can simply select the target account & region from the UI to deploy their services. Admins can add/remove new accounts/regions to the stack with ease.
Other Features – Jazz comes with many useful integrations like SCM (Gitlab/Bitbucket), monitoring (CloudWatch), logging (ElasticSearch), authentication (Cognito), access controls, code quality metrics (SonarQube) by default.
Utilities – Jazz comes with many utilties that allow admins to monitor, govern and report the usage of serverless services through Jazz environment.
Jazz is open-sourced and under active development by T-Mobile’s Cloud Center of Excellence.
Following is the high level logical architecture of Jazz.
Installation
You can install Jazz in your AWS account using the automated installer.
Try Jazz!
You can try out public preview version of Jazz by registering with your email address here. You will need a registration code which can be requested by joining slack.
Platform Development
Branching/Release Strategy
Breaking/nontrivial features first go into named feature branches cut from develop
When/if a feature branch is chosen to be included in the next release, it is merged into develop
Release testing happens in develop
When confirmed/vetted, develop is merged into master, and master becomes the current release.
Small fixes explicitly intended for the next release can be PRed directly into develop without first needing a feature branch.
tl;dr master is always the current release, develop is always the current state of the next release. If you want to contribute a PR, we recommend you fork and work in a branch off of develop, then PR against develop. Project owners will move you into a feature branch if they deem it necessary.
cargo-llvm-cov excludes code contained in the directory named tests from the report by default, so you can also use it instead of #[coverage(off)] attribute.
Unless you explicitly state otherwise, any contribution intentionally submitted
for inclusion in the work by you, as defined in the Apache-2.0 license, shall
be dual licensed as above, without any additional terms or conditions.
This is a simple world historical map based on OpenHistoricalMap data that is suitable for embedding inside a third-party webpage. Using URL parameters, you can choose a location, time period, and cartographic style. To show a place’s evolution, you can also animate smoothly between two arbitrary dates. The map responds to gestures interactively, but the dates can only be adjusted via the URL.
Visit the map directly at embed.openhistoricalmap.org. Or export a code snippet for your webpage by opening the Share panel on the right side of OHM’s homepage and changing the format to “HTML”.
URL parameters
Viewport
The URL has typical z/x/y parameters for map zoom and center.
So a parameter like #map=10/43.9367/12.5528 is zoom 10 showing San Marino in Italy, which is at 43.9367/12.5528 in lon,lat format of decimal degrees. See the map.
An embedded map is typically of a different size and aspect ratio from the original and thus must be scaled in order to cover a comparable area. This is accomplished by passing the original map’s bounding box in the hash as &bbox=minlon,minlat,maxlon,maxlat. Once the embedded map gets its initial framing from the bbox the normal hash mechanism takes over. The San Marino example could be bounded by appending &bbox=12.321338653564453,43.86782687726672,12.58037567138672,44.008373185063874 to the URL. See this map.
Projection
The projection parameter accepts the following values:
mercator, Web Mercator projection, represents the world as a square. It allows you to view both hemispheres at the same time but with extreme area distortion at the upper latitudes. This is the default projection.
vertical-perspective, Vertical Perspective projection, resembles a globe. It avoids area distortion but only shows one hemisphere at a time.
globe is a hybrid of vertical-perspective at low zoom levels and mercator at high zoom levels where the Web Mercator projection’s distortions matter much less.
The 🌐 button at the upper-left corner toggles between mercator and globe projection.
Dates
Without a date parameter, the map shows everything in the OHM tiles for which there is a style specified.
OHM-specific parameters:
date is a valid YYYY, YYYY-MM, or YYYY-MM-DD date, but we allow the year to be a variable number of digits or negative, unlike ISO 8601-1. So here is San Marino in the year 1500 #map=10/43.9367/12.5528&date=1500. See this map.
layer selects one of the OHM-compatible styles currently offered on openhistoricalmap.org:
The map can optionally animate if you specify the following parameters:
start_date is the initial value of date at the beginning of the animation. If you also specify date, the start_date is ignored in favor of date.
end_date is the final value of date at the end of the animation.
interval is the difference in the dates depicted by any two consecutive frames of the animation, expressed as an ISO 8601-1 duration. For example, P10Y6M1D advances each frame by 10 years, 6 months, and 1 day, while -P10Y6M1D turns back the clock by 10 years, 6 months, and 1 day on each frame. This parameter only supports years, months, and/or days. By default, the animation advances by one year at a time.
framerate is the frequency of the animation measured in hertz, defaulting to 1 (1 hertz, or 1 frame per second).
Language
By default, map labels appear in your preferred language according to your browser preferences. You can also override this preference by setting the language parameter to an ISO 639 language code. For example, add &language=grc&date=-0999 to see Middle Babylon labeled in Ancient Greek or &language=la&date=-0999 to see it in Latin instead of the contemporary cuneiform. If OHM doesn’t have the name of a place in this preferred language, the label appears in the contemporary local language as a last resort. To force the display of names in contemporary local languages, set the language parameter to mul (the ISO 639 code for multilingual content).
Embedding
Simply use code like this to embed:
<iframesrc="https://embed.openhistoricalmap.org/#map=10/43.9367/12.5528&date=1500&layer=O" height="500" width="100%" title="OpenHistoricalMap: San Marino in 1500"></iframe>
Please submit bug reports and feature requests to OpenHistoricalMap’s central issue tracker, noting “OpenHistoricalMap embed” somewhere in the title or description.
The model consists of a CNN stage extracting features which are fed
to an RNN stage (Bi-LSTM) and a CTC loss.
Installation
This software has been developed on Ubuntu 16.04(x64) using python 3.5 and
TensorFlow 1.15. Since it uses some recent features of TensorFlow which is
incompatible with older versions.
The following methods are provided to install dependencies:
Conda
You can create a conda environment with the required dependencies using:
conda env create -f crnntf-env.yml
Pip
Required packages may be installed with
pip3 install -r requirements.txt
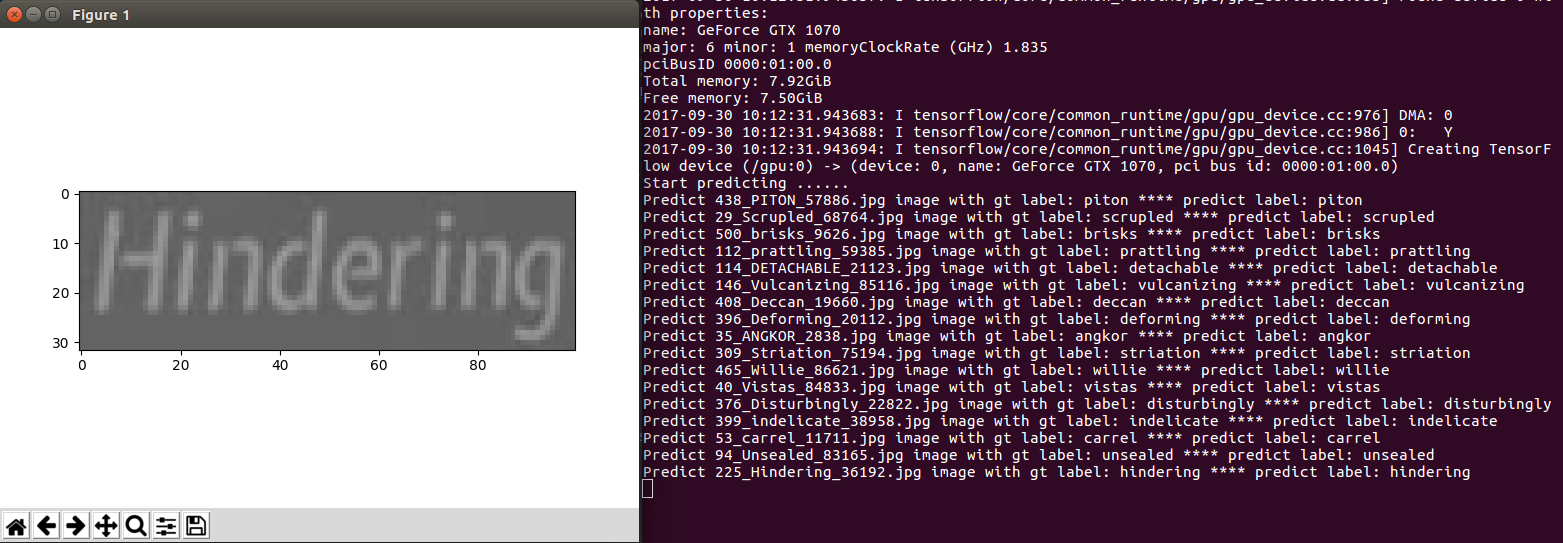
Testing the pre-trained model
Evaluate the model on the synth90k dataset
In this repo you will find a model trained on the
Synth 90k dataset. When the tfrecords
file of synth90k dataset has been successfully generated you may evaluated the
model by the following script
The pretrained crnn model weights on Synth90k dataset can be found
here
Download the whole synth90k dataset here
And extract all th files into a root dir which should contain several txt file and
several folders filled up with pictures. Then you need to convert the whole
dataset into tensorflow records as follows
If you wish, you can add more metrics to the training progress messages with
--decode_outputs 1, but this will slow
training down. You can also continue the training process from a snapshot with
If you has multiple gpus in your local machine you may use multiple gpu training
to access a larger batch size input data. This will be supported as follows
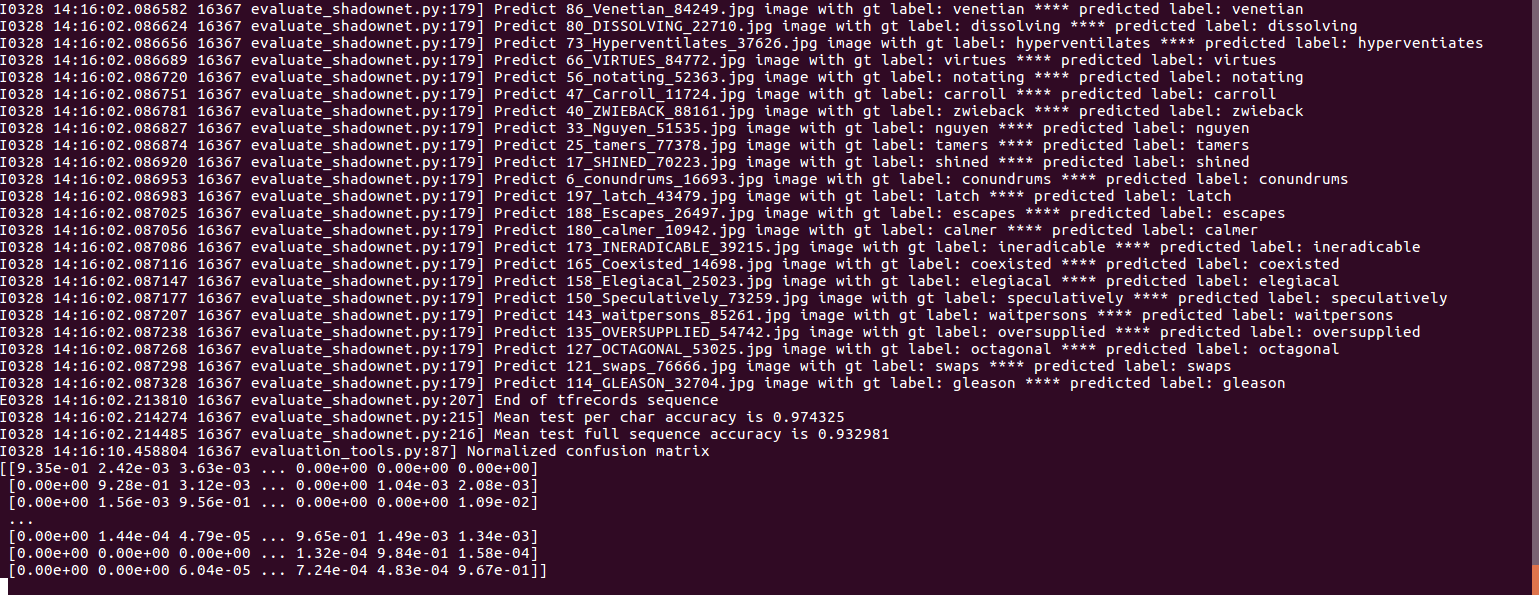
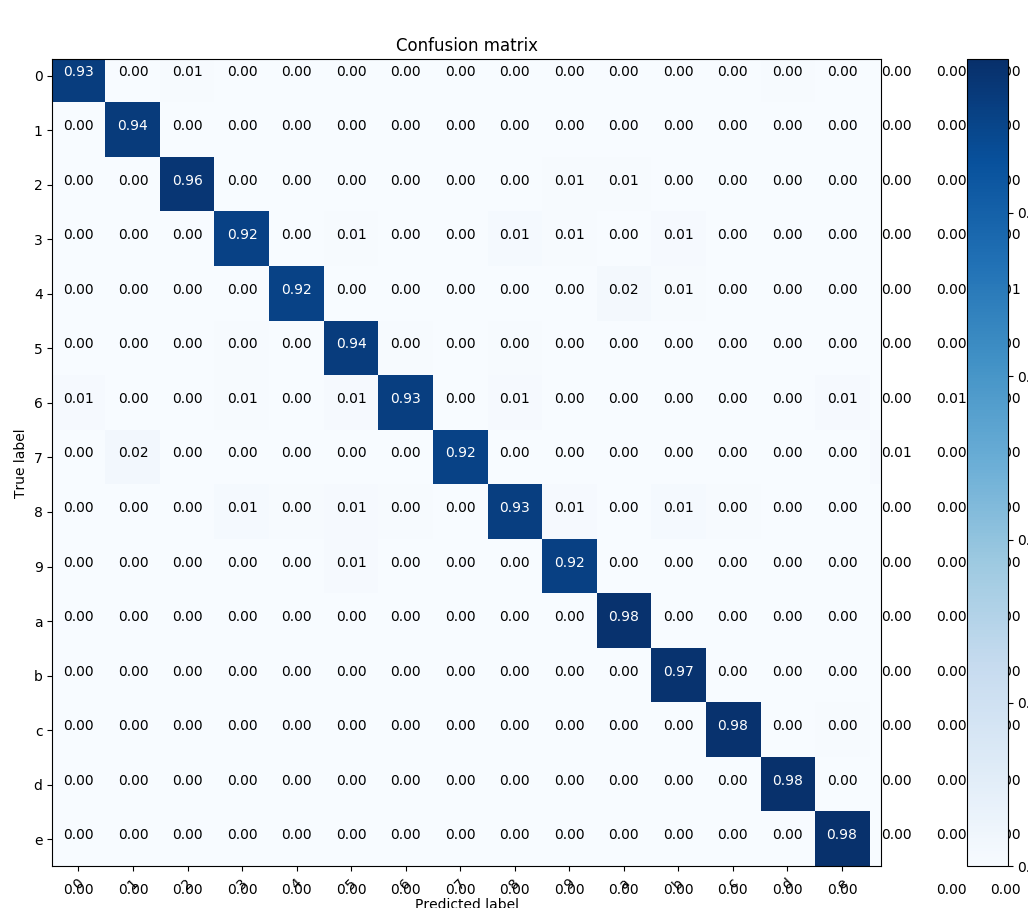
The sequence distance is computed by calculating the distance between two
sparse tensors so the lower the accuracy value
is the better the model performs. The training accuracy is computed by
calculating the character-wise precision between
the prediction and the ground truth so the higher the better the model performs.
Tensorflow Serving
Thanks for Eldon’s contribution of tensorflow
service function:)
Since tensorflow model server is a very powerful tools to serve the DL model in
industry environment. Here’s a script for you to convert the checkpoints model file
into tensorflow saved model which can be used with tensorflow model server to serve
the CRNN model. If you can not run the script normally you may need to check if the
checkpoint file path is correct in the bash script.
bash tfserve/export_crnn_saved_model.sh
To start the tensorflow model server you may check following script
bash tfserve/run_tfserve_crnn_gpu.sh
There are two different ways to test the python client of crnn model. First you may
test the server via http/rest request by running
Second you may test the server via grpc by running
python tfserve/crnn_python_client_via_grpc.py
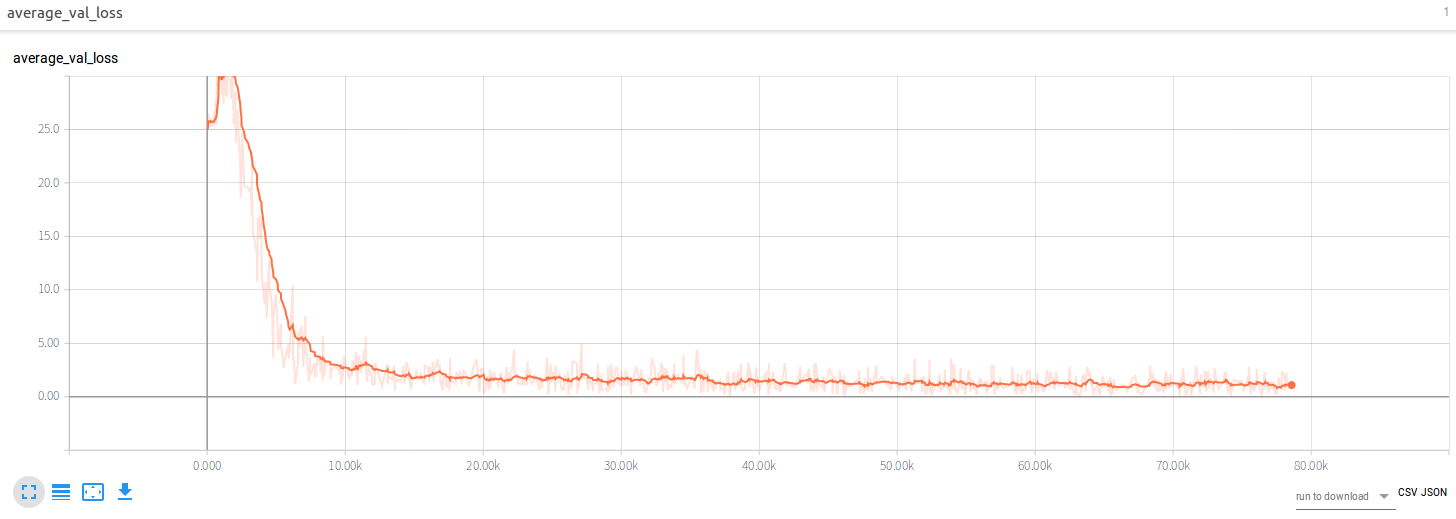
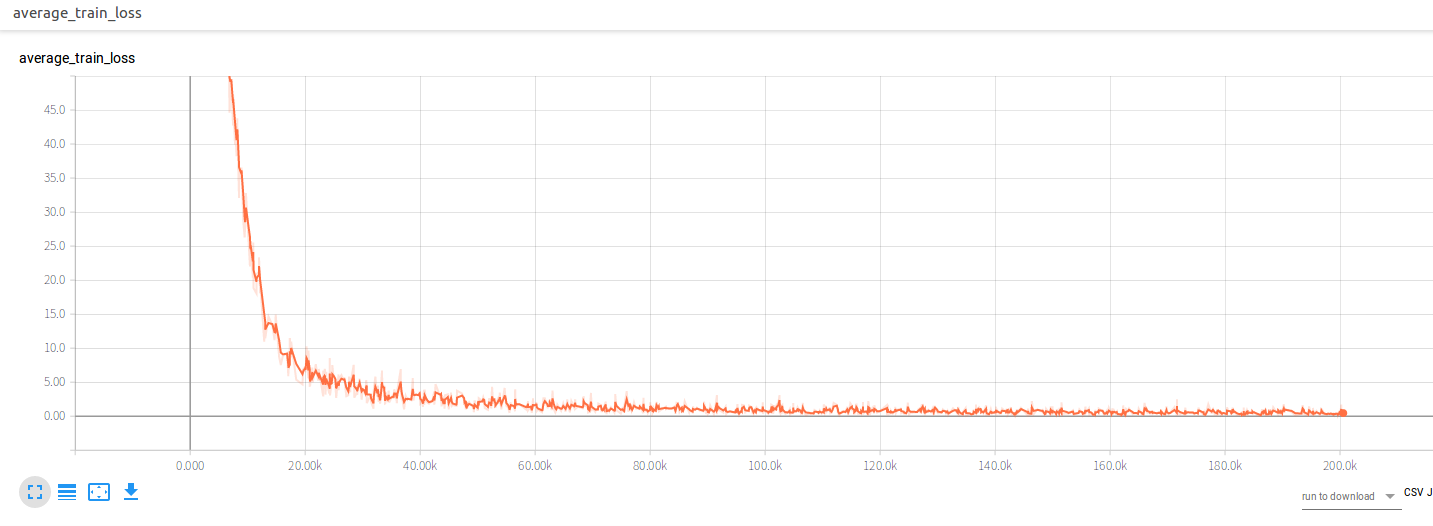
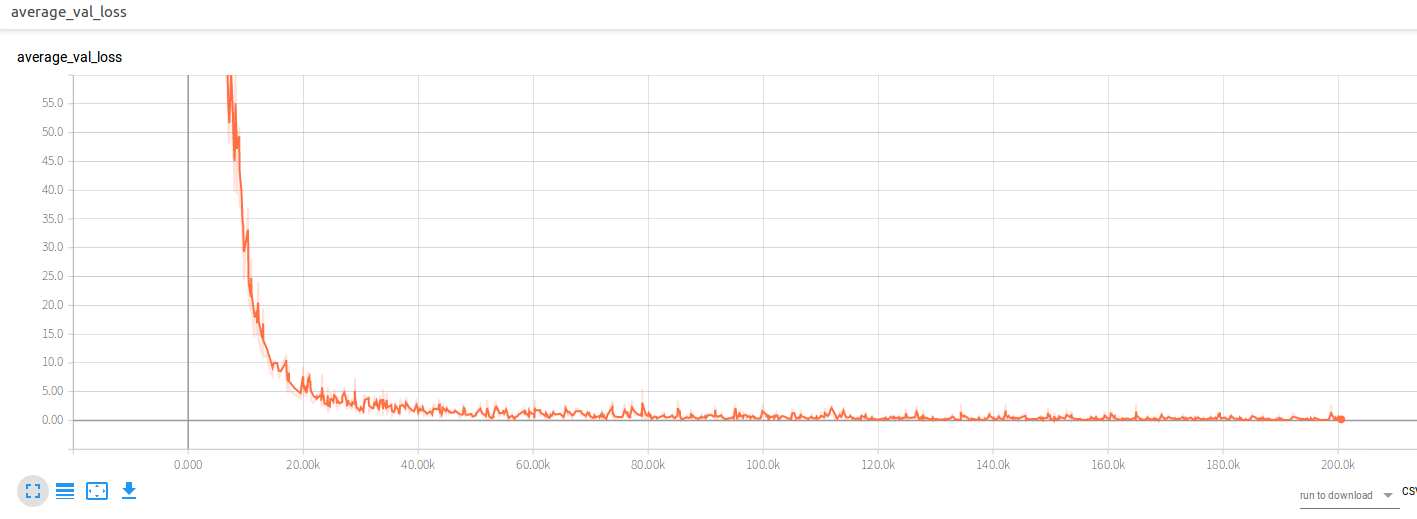
Experiment
The original experiment run for 2000000 epochs, with a batch size of 32,
an initial learning rate of 0.01 and exponential
decay of 0.1 every 500000 epochs. During training the train loss dropped as
follows
The val loss dropped as follows
2019.3.27 Updates
I have uploaded a newly trained crnn model on chinese dataset which can be found
here. Sorry for not knowing
the owner of the dataset. But thanks for his great work. If someone knows it
you’re welcome to let me know. The pretrained weights can be found
here
Before start training you may need reorgnize the dataset’s label information according
to the synth90k dataset’s format if you want to use the same data feed pip line
mentioned above. Now I have reimplemnted a more efficient tfrecords writer which will
accelerate the process of generating tfrecords file. You may refer to the code for
details. Some information about training is listed bellow:
image size: (280, 32)
classes nums: 5824 without blank
sequence length: 70
training sample counts: 2733004
validation sample counts: 364401
testing sample counts: 546601
batch size: 32
training iter nums: 200000
init lr: 0.01
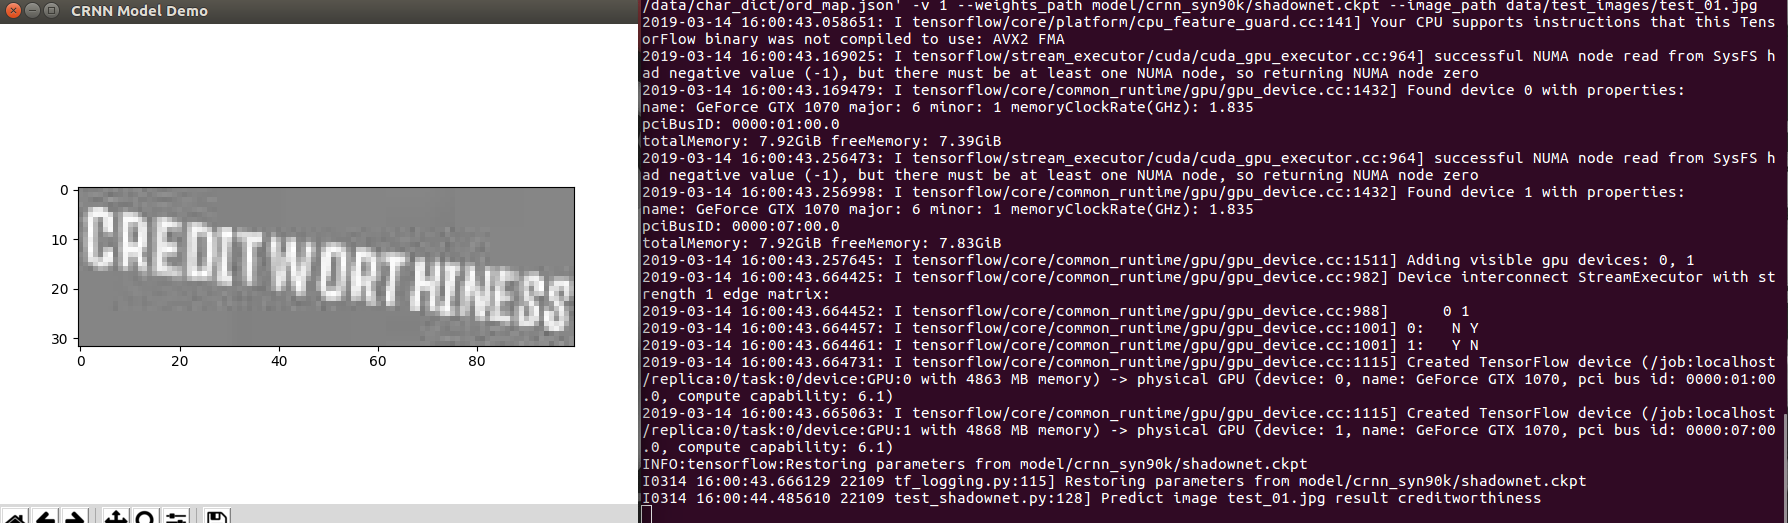
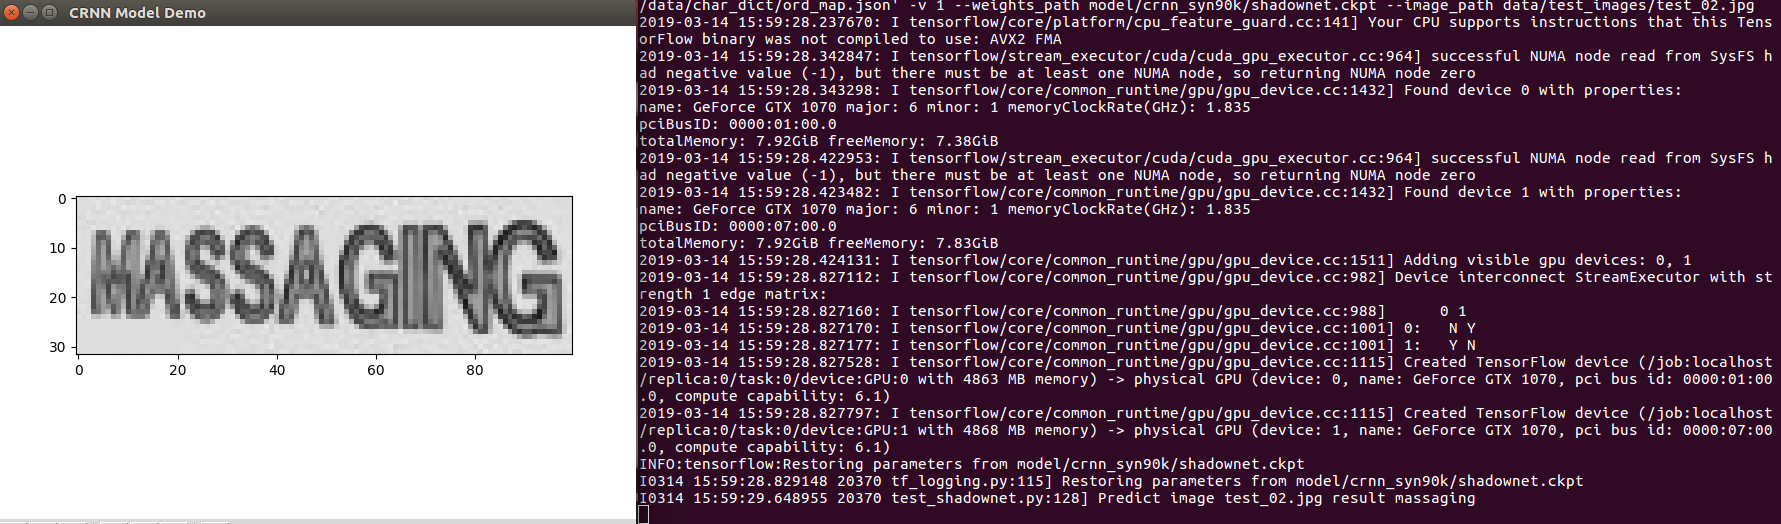
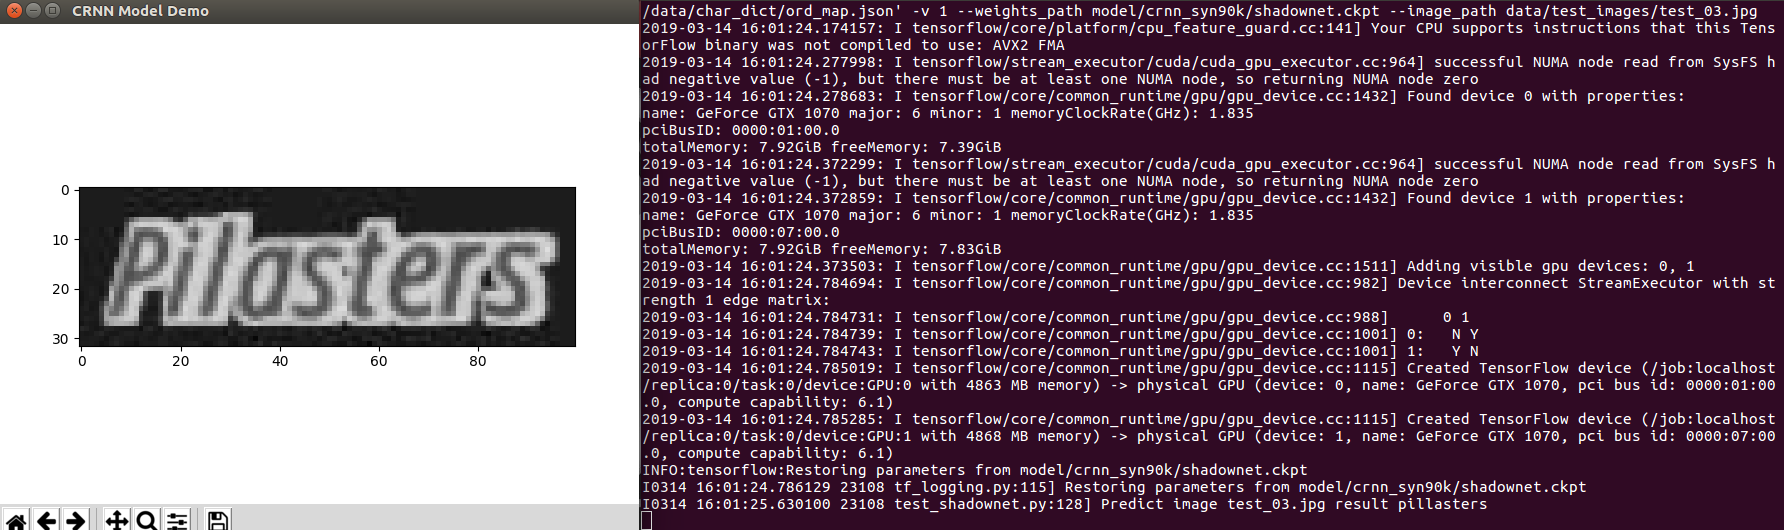
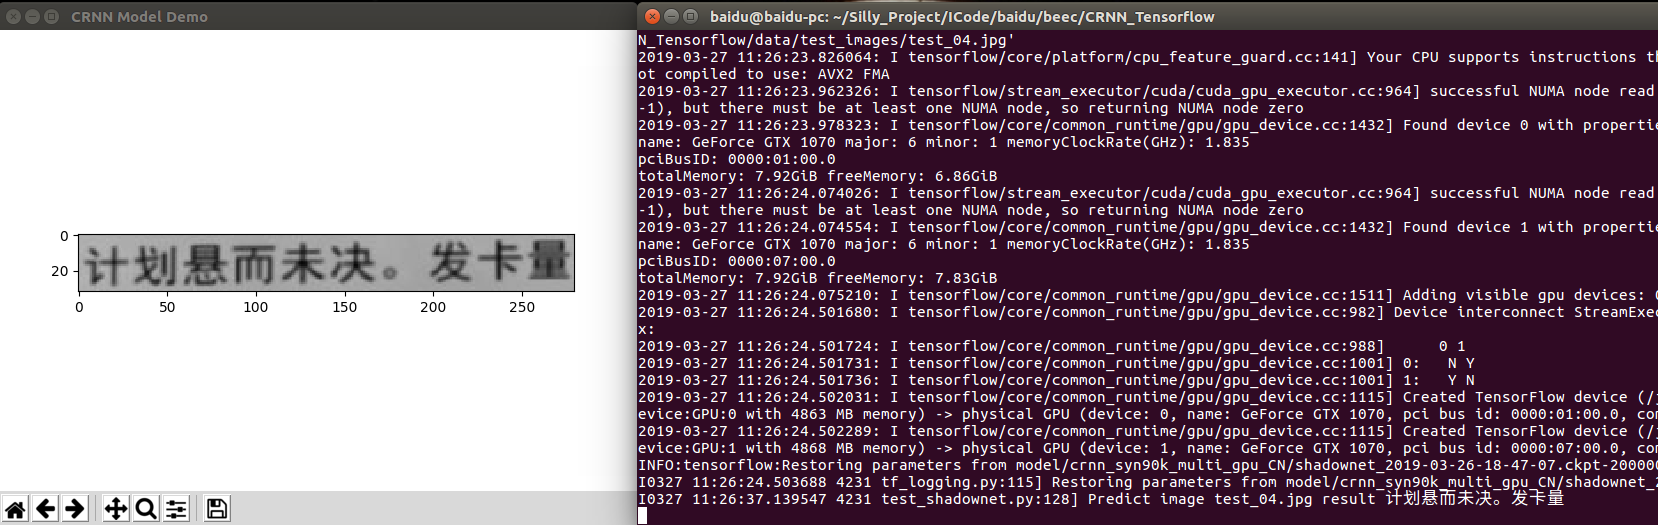
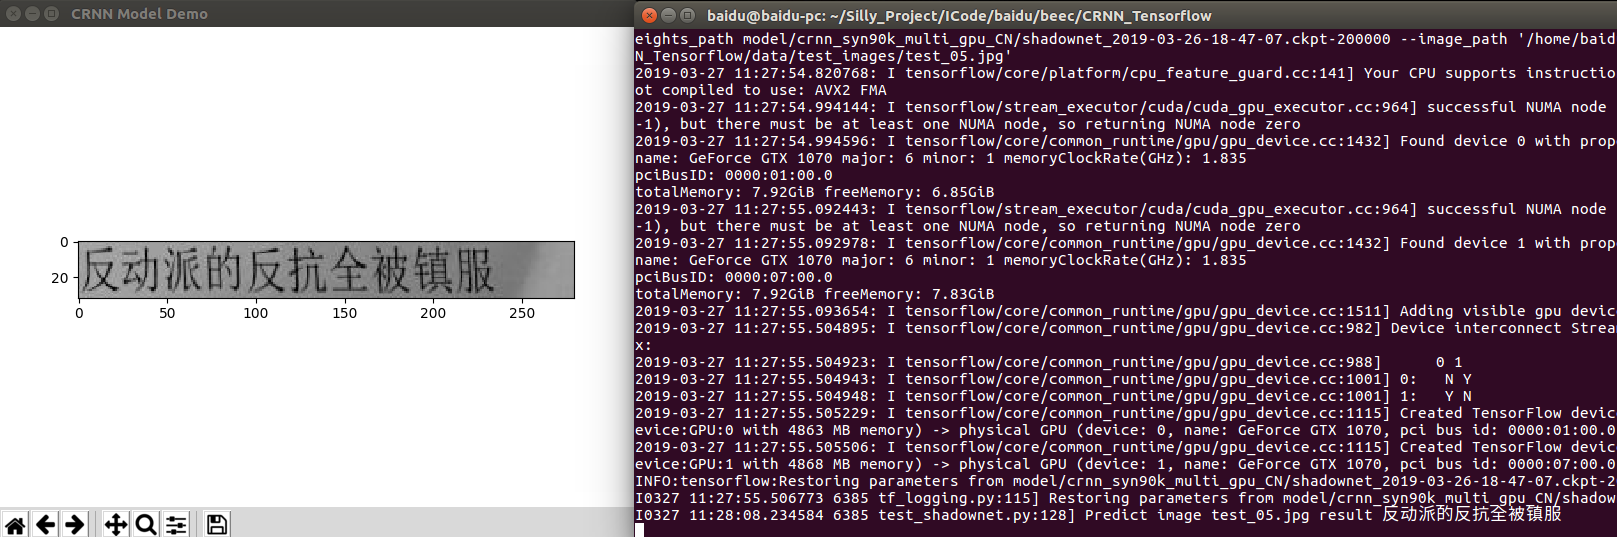
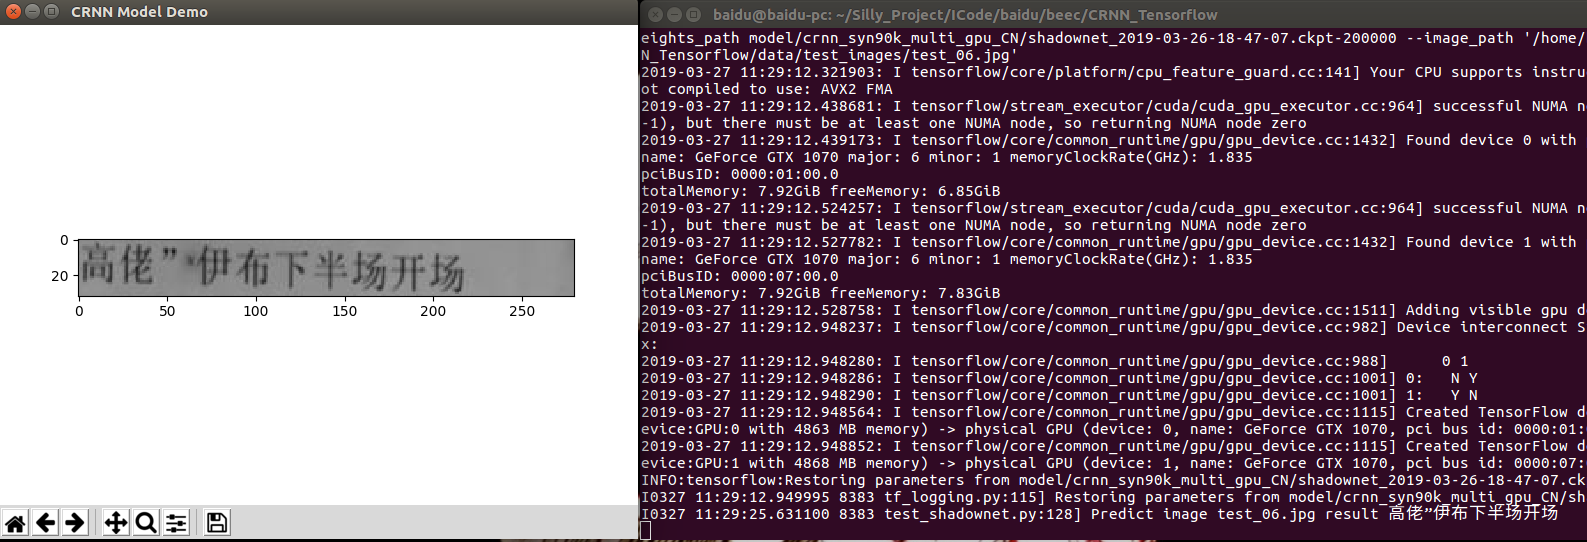
Test example images
Example test_01.jpg
Example test_02.jpg
Example test_03.jpg
training tboard file
The val loss dropped as follows
2019.4.10 Updates
Add a small demo to recognize chinese pdf using the chinese crnn model weights. If you
want to have a try you may follow the command:
---
# defaults file for moodle# The version of moodle to install.moodle_version: 401# A path where to save the data.moodle_data_directory: /opt/moodledata# The permissions of the created directories.moodle_directory_mode: "0750"# Details to connect to the database.moodle_database_type: mysqlimoodle_database_hostname: localhostmoodle_database_name: moodlemoodle_database_username: moodlemoodle_database_password: moodlemoodle_database_prefix: ""# The URL where to serve content.moodle_wwwroot: "https://{{ ansible_default_ipv4.address }}/moodle"
Our config includes the option to choose the resolution and fps, for example:
importtensorflow_datasetsastfdsimportsign_language_datasets.datasetsfromsign_language_datasets.datasets.configimportSignDatasetConfig# Loading a dataset with default configurationaslg_pc12=tfds.load("aslg_pc12")
# Loading a dataset with custom configurationconfig=SignDatasetConfig(name="videos_and_poses256x256:12",
version="3.0.0", # Specific versioninclude_video=True, # Download and load dataset videosprocess_video=True, # Process videos to tensors, or only save path to videofps=12, # Load videos at constant, 12 fpsresolution=(256, 256), # Convert videos to a constant resolution, 256x256include_pose="holistic") # Download and load Holistic pose estimationrwth_phoenix2014_t=tfds.load(name='rwth_phoenix2014_t', builder_kwargs=dict(config=config))
Make a new folder inside sign_language_datasets/datasets with the same name as the dataset. As a convention, the name
of the dataset should be lowercase and words should be separated by an underscore. Example:
cd sign_language_datasets/datasets
tfds new new_dataset
For our purposes, creating a custom TFDS dataset means writing a new class which inherits
from tfds.core.GeneratorBasedBuilder. If you use tfds new to create a new dataset then the dataset class is stored
in a file with the exact same name as the dataset, i.e. new_dataset.py. new_dataset.py must contain a line similar
to:
classNewDataset(tfds.core.GeneratorBasedBuilder):
Registering a new dataset
The mechanism to add a custom dataset to TFDS’ dataset registry is to import the class NewDataset. For this reason the
folder
sign_language_datasets/datasets/new_dataset must have an __init__.py file that imports the class
NewDataset:
from .new_datasetimportNewDataset
Even though the name of the class is NewDataset, it will be available for loading in lowercase and uppercase
characters are interpreted as the start of a new word that should be separated with an underscore. This means that the
class can be loaded as follows:
ds=tfds.load('new_dataset')
Generating checksums
The folder for the new dataset should contain a file checksums.tsv with checksums for every file in the dataset. This
allows the TFDS download manager to check the integrity of the data it downloads. Use the tfds build tool to generate
the checksum file:
tfds build --register_checksums new_dataset.py
Use a dataset configuration which includes all files (e.g. does include the video files if any) using the --config
argument. The default behaviour is to build all configurations which might be redundant.
Why not Huggingface Datasets?
Huggingface datasets do not work well with videos. From the lack of native support of the video type, to lack of support
of arbitrary tensors. Furthermore, they currently have memory leaks that prevent from saving even the smallest of video
datasets.
Cite
@misc{moryossef2021datasets,
    title={Sign Language Datasets},
    author={Moryossef, Amit and M\"{u}ller, Mathias},
    howpublished={\url{https://github.com/sign-language-processing/datasets}},
    year={2021}
}
This is the code repository for the paper “Geometric Mechanics of Contact-Switching Systems”: <10.1109/LRA.2023.3327930>. This repository can generate the plots provided in the paper.
Information on using this repository
Each file within the “Code” folder is intended to be run sectionwise. For more details on the terminology and techniques, please refer to the paper linked above.
The stratified panels shown in the paper (in Fig.1(c), Fig.3(d), Fig.3(e), Fig.4(b), and Fig.6) are generated in the “EfficiencyAndPanels.m” code.
The contact interpolation Fig.3(a) is generated in the “ContactInterpolationFunction.m” code.
The local connection vector fields and the constraint curvature functions shown in figures 3(b) and 3(c) are generated using the GeometricSystemPlotter repository developed by collaborators at OSU. A link to this repository can be found here: https://github.com/OSU-LRAM/GeometricSystemPlotter. The code for the class of systems explored in this paper is provided in the “GeometricSystemPlotter” folder in the exact same structure of the GeometricSystemPlotter repository. So, if you’re interested in testing things out on the systems used in this paper, please clone the repository from that link and then copy the contents of the “GeometricSystemPlotter” folder into their corresponding location.
The shape change or gait trajectory in Fig.4(a) is generated in the “ContactInterpolationFunction.m” code.
All animations provided with this paper can be recreated using the “Animations_HybridContact.m” code.
The main video for this paper can be found in the “Video” folder. This video is intended to be a condensed illustrative aid to the paper (with less jargon).
2FA-Auth is a BASH script that provides a user-friendly way to generate “Two-Factor Authentication (2FA)” code. It works like Google Authenticator® and similar programs, but you can use your GNU/Linux terminal, instead of your cellphone.
For more information, look for “Two-Factor Authentication” in sites or forums.
System Requirement
GNU/Linux distribution with BASH interpreter
GIT — used to clone 2FA-Auth into your computer
GnuPG — used to keep your site/service token encrypted
OATH Toolkit a.k.a. OATHTOOL — used to generate 2FA codes
2FA-Auth can automatically install GnuPG and OAth Toolkit, but if it fails, please check how to install the programs above, according to your distribution.
This automatic method of package installation involves these package managers:
APT and APT-GET for Debian-based systems
DNF, URPMI and YUM for RedHat-based systems
EMERGE and EQUO for Gentoo-based systems
PACMAN for Arch-based systems
ZYPPER for SUSE/openSUSE-based systems
The next step is that you MUST create or import GPG Keys in your profile. They are used by GnuPG to encrypt and decrypt your tokens.
PDF FILE: “2FA-Auth/doc/How_to_use_2FA-Auth.pdf”
This file explain how to use 2FA-Auth.
It’s a simple “how to use” manual, but it helps you A LOT!
Where does 2FA-Auth save my tokens and GnuPG ID?
GPG key is created (or imported) into $HOME/.gnupg/ while GPG ID is part of your key (UserID) and 2FA-Auth asks for it. Your UserID is the e-mail used to create your key.
2FA-Auth saves your 2FA token(s) in this directory: $HOME/.config/2fa-auth/ and your GnuPG UserID is saved in $HOME/.config/2fa-auth/2fa-auth.info